A description of which types of information can be printed, and how to print them.
All Avatar users have the ability to print information that they have access to. Access depends on user role.
There are three types of information that can be printed in Avatar.
Reports are collections of data that are determined by the user, and are discussed in detail in this article: Running Reports Printing is accomplished by creating a report as per the instructions in the aforementioned article and selecting one of the print options available, dependent upon the type of report created.
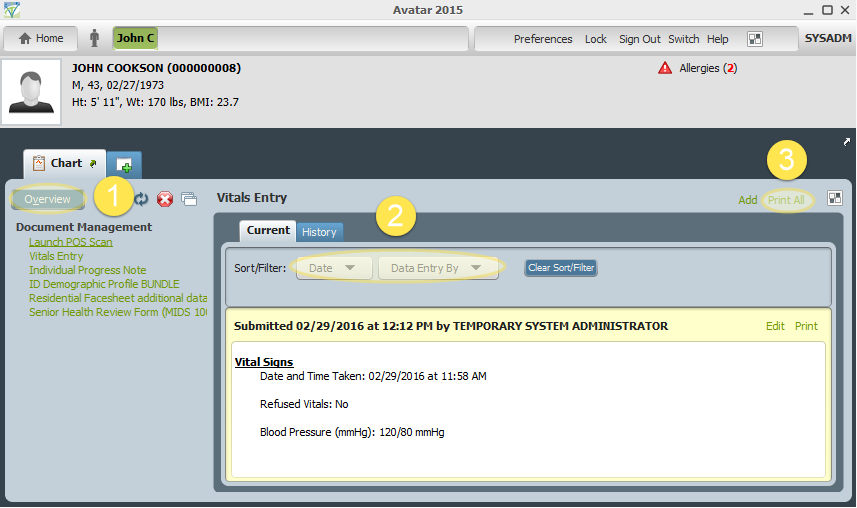
Chart Documents are accessed in the Overview (1 in the image below), shown when you access the Chart View. Available documents are listed on the left of the screen under the Overview button (available documents will vary depending upon user role and system setup). Select a document and filter results as/if required (2). Click Print All (3) on the right to print the selected document(s).
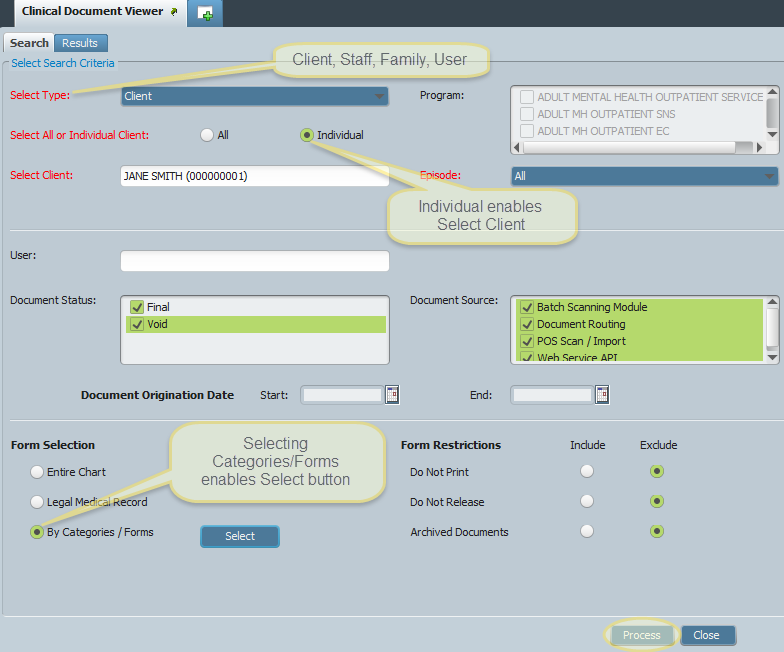
The Clinical Document Viewer allows searching for specific types of information according to specific groups (Client, Staff, Family, User). Data can be further refined by Program, Episode, Document Source/Status, and Date. Open the Clinical Document Viewer by searching in the Search Forms field of the Home View or following the menu path - Avatar CWS/Document Management/Clinical Document Viewer. This is the viewer as it opens to the Search function:
![]()
The user must select the Type of record to search (Client, Family, Staff, User - only 1 selection can be made), and whether to search All clients or an Individual. If Individual is selected, the Select Client filed activates allowing input of a client name. The field uses a live search by last name that narrows as more information is entered. If an individual record is selected, the user must also choose which Episode to search.
All available Programs can be used to narrow search results. Select by checking as many boxes as desired. All programs can be selected at once by checking one and pressing CTRL A.
You can choose to only display Final or Voided documents by checking the appropriate boxes, as well as Document Sources.
Document Origination Date can be selected in a From-To format by entering dates in their respective fields.
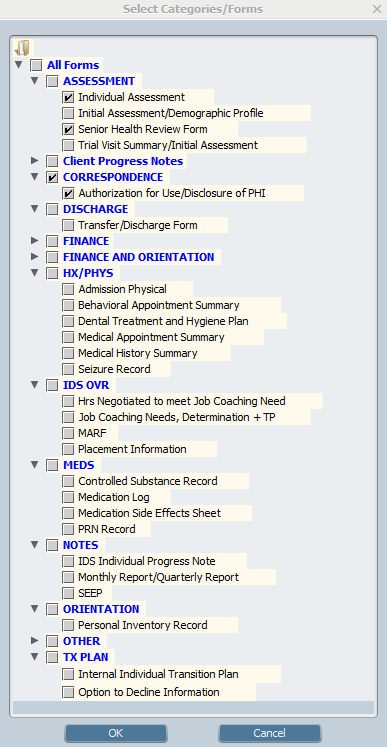
The Form Selection section can be used to specify whether to search the entire chart, the Legal Medical Record, or specific Categories/Forms. Select by clicking the radio button(s). If By Categories/Forms is used and the Select button is clicked, a new search window opens showing all available categories and forms that can be selected.
Check boxes to include specific items. Collapse and expand sections by clicking the arrows next to the titles. Click OK to use the search.
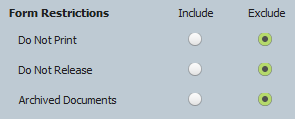
By using the Form Restrictions section, a user can choose to restrict the search by excluding documents that have been marked Do Not Print, Do Not Release, or Archived Documents.
When satisfied, click Process to run the report and display the data. You can switch between the results and the search screen by switching the Search/Results tabs at the top of the screen.
Results are displayed in 2 ways. On the left of the screen from top to bottom is a tree view of all results by type. Information can be expanded or collapsed by clicking the arrows next to each type of document. Results are displayed by Client and Form Category first, then further by Name, Category, etc. Clicking a folder will open that document and show it in the main viewer portion of the screen.
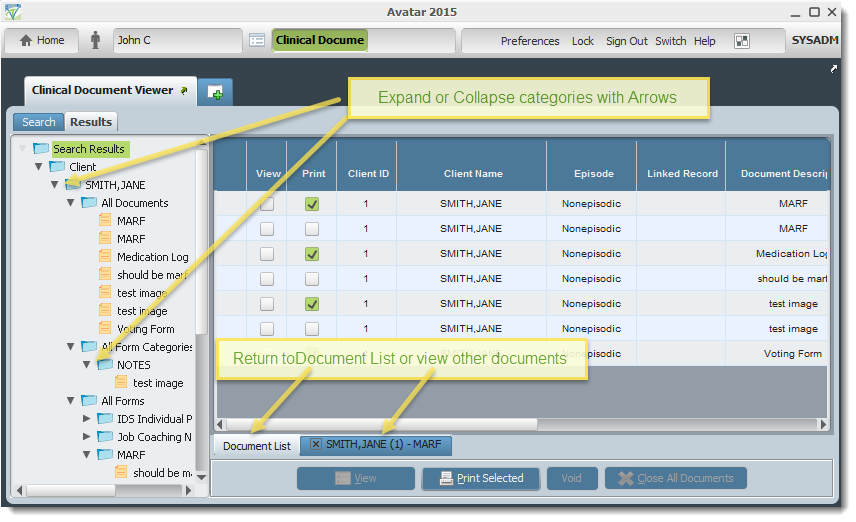
The main part of the screen is the document viewer which will display all search results in a list that contains information such as View & Print option check boxes, Client ID, Name, Episode #, Linked Record (if applicable), Document Description, Date, Status, Form Name, User that created the document, and whether or not it has been marked as Do Not Release. Click the Print checkboxes next to the records you wish to print and click the Print Selected button on the bottom of the viewer.
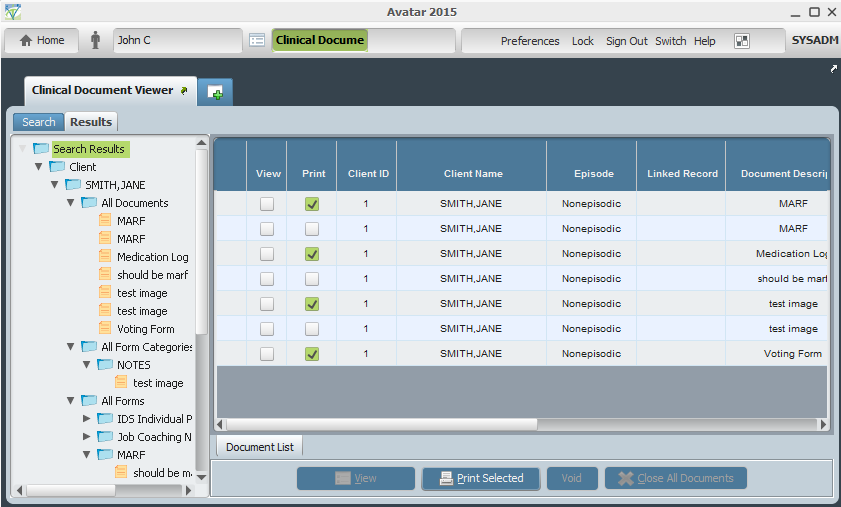
If you wish to print a single document, you can follow the instructions above or click the document name in the list and click the Printer icon on the top row of buttons.

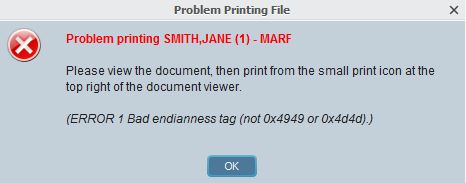
If the following error appears, follow the instructions above to print documents individually.
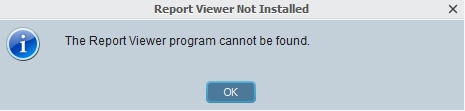
If the following error appears, contact your system administrator to install the program:
If using a local printer, please secure all documents and keep them out of view.
Only printers that have been previously installed on your particular workstation will be available to add to Avatar. If you require a printer that has not been added, please add it manually or contact your IT department for assistance.
If an error occurs stating that the "Report Viewer Cannot Be Found" please contact your IT Department to install the Viewer program.
Menu Location Avatar CWS/Document Management/Clinical Document Viewer)
Article ID: 42
Created On: Tue, Mar 1, 2016 at 4:37 PM
Last Updated On: Tue, Jul 19, 2016 at 10:20 AM
Authored by: John Cookson [jcookson@fivebase.com]
Online URL: https://www.mercykb.com/article.php?id=42